Nowadays, many people would like to make video tutorials to deliver their messages rather than using texts. But lots of recording software is very difficult to use. Sometimes, people cannot figure out how to use a screen recorder. So is there a simple but professional screen recording software? Of course, yes. RecordAnyVid is one of them with no doubt. For recording video tutorials, game videos, online meetings, etc., RecordAnyVid software can help you.
So what is recordanyvid? RecordAnyVid is a software that integrates screen recording, audio recording, and screen capture, suitable for Windows , MacOS & ChromeOS. For a free version, you can record no more than 3 minutes of video or audio. If you want to record a screen without limitation, then you can purchase its license code to get more services. Let’s see how to record the computer screen with this simple screen recorder.
Table of Contents
Part 1. How to Record Video from Computer with RecordAnyVid
First of all, download RecordAnyVid on your computer. After installing RecordAnyVid software to your computer, you’ll find this powerful screen recorder is very easy to master even if you are totally a starter.
Step 1: Open Video Recorder
When you launch RecrodAnyVid, you’ll see 3 choices – Video Recorder, Audio Recorder, Screen Capture. To record the computer screen, you can choose the Video Recorder in this step.

Step 2: Select Recording Area
You can record the full screen or a custom size of your computer screen with RecordAnyVid. Moreover, if you want to make a webcam recording, please make sure your webcam has connected to your computer.

Step 3: Preference Settings
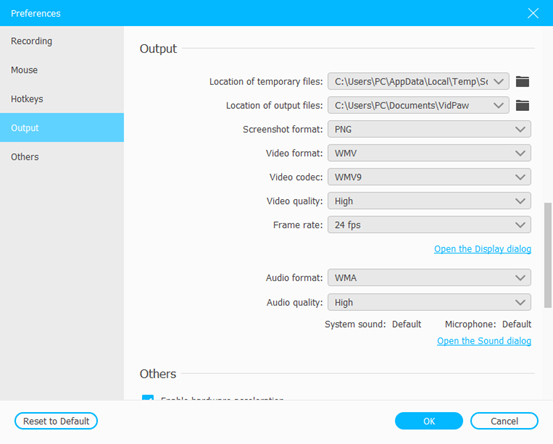
RecordAnyVid supports to record both of system sound and microphone sound. If you don’t need to record any voice-over, you can turn off the microphone option to get a better audio recording quality. For output settings, you can click the gear icon to change location path, output format and quality base on your needs.
Step 4: Start Record Computer Screen
Click the “REC” button to start recording video from the computer. Besides, this screen recorder supports to edit recording video in real-time. If you are recording a video tutorial, it’s very helpful. You can add circles, rectangles, arrows, and texts to highlight your information.

Step 5: Save Recorded Video
Click the red square button to stop recording your computer screen. Before saving, you can preview the recording video to check if it’s fine. Then, you can click the “Save” button to finish the recording process.
Part 2. How to Record Audio from Computer with RecordAnyVid
In addition to record videos from the computer screen, RecordAnyVid is also able to capture any voice and audio from your computer. The whole recording process is easy to follow.
Step 1: Open Audio Recorder

Step 2: Adjust Audio Recording Settings
System sound and microphone sound can be recorded with RecordAnyVid. If you don’t need to record microphone sound, it’s recommended to turn this option off in order to get rid of environment noise.

Step 3: More Preference Settings ( Optional )
If you want to change the output format and quality, you can click the gear icon to open Preference settings. > Choose “Output”. By default, the output audio file will be saved in WMV. If you need an MP3 file, you can change it in this step.

Step 4: Start Recording Audio from Computer
Go back to the interface. > Click the “REC” button to start recording audio from a computer. You can volume up and download recording sound on your own. When finished, you can directly click the stop button to save the audio file.

Part 3. How to Make Screenshots with RecordAnyVid
As for screenshots, you can easily click Screen Capture to start capturing screenshots. Moreover, RecordanyVid supports to edit the screenshot before saving.

Here’s an easier method – using hotkeys. In this way, as long as the software is running in the background, you can use the hotkey you set to take a screenshot without opening the software interface. You can change hotkeys in Preference settings.
Here’s so much about how to use RecordAnyVid to capture your computer screen on Windows and Mac. All in all, this screen recorder is easy-to-use but 100% professional. If you are looking for a powerful screen recorder, why not try RecordAnyVid?

![[Full Guide] How to Use Screen Recorder to Capture Computer Screen | 2025](https://www.computertechreviews.com/wp-content/uploads/2020/02/How-to-Use-Screen-Recorder-to-Capture-Computer-Screen-1200x675.jpg)