Table of Contents
How to take a Screenshot on a Mac
In this article you will be seeing different options of how to take a screenshot on Mac. A step by step guide of with detailed screenshots and Videos.
Source: https://www.take-a-screenshot.org/mac.html
How to take a Screenshot on a Mac – Full Screen
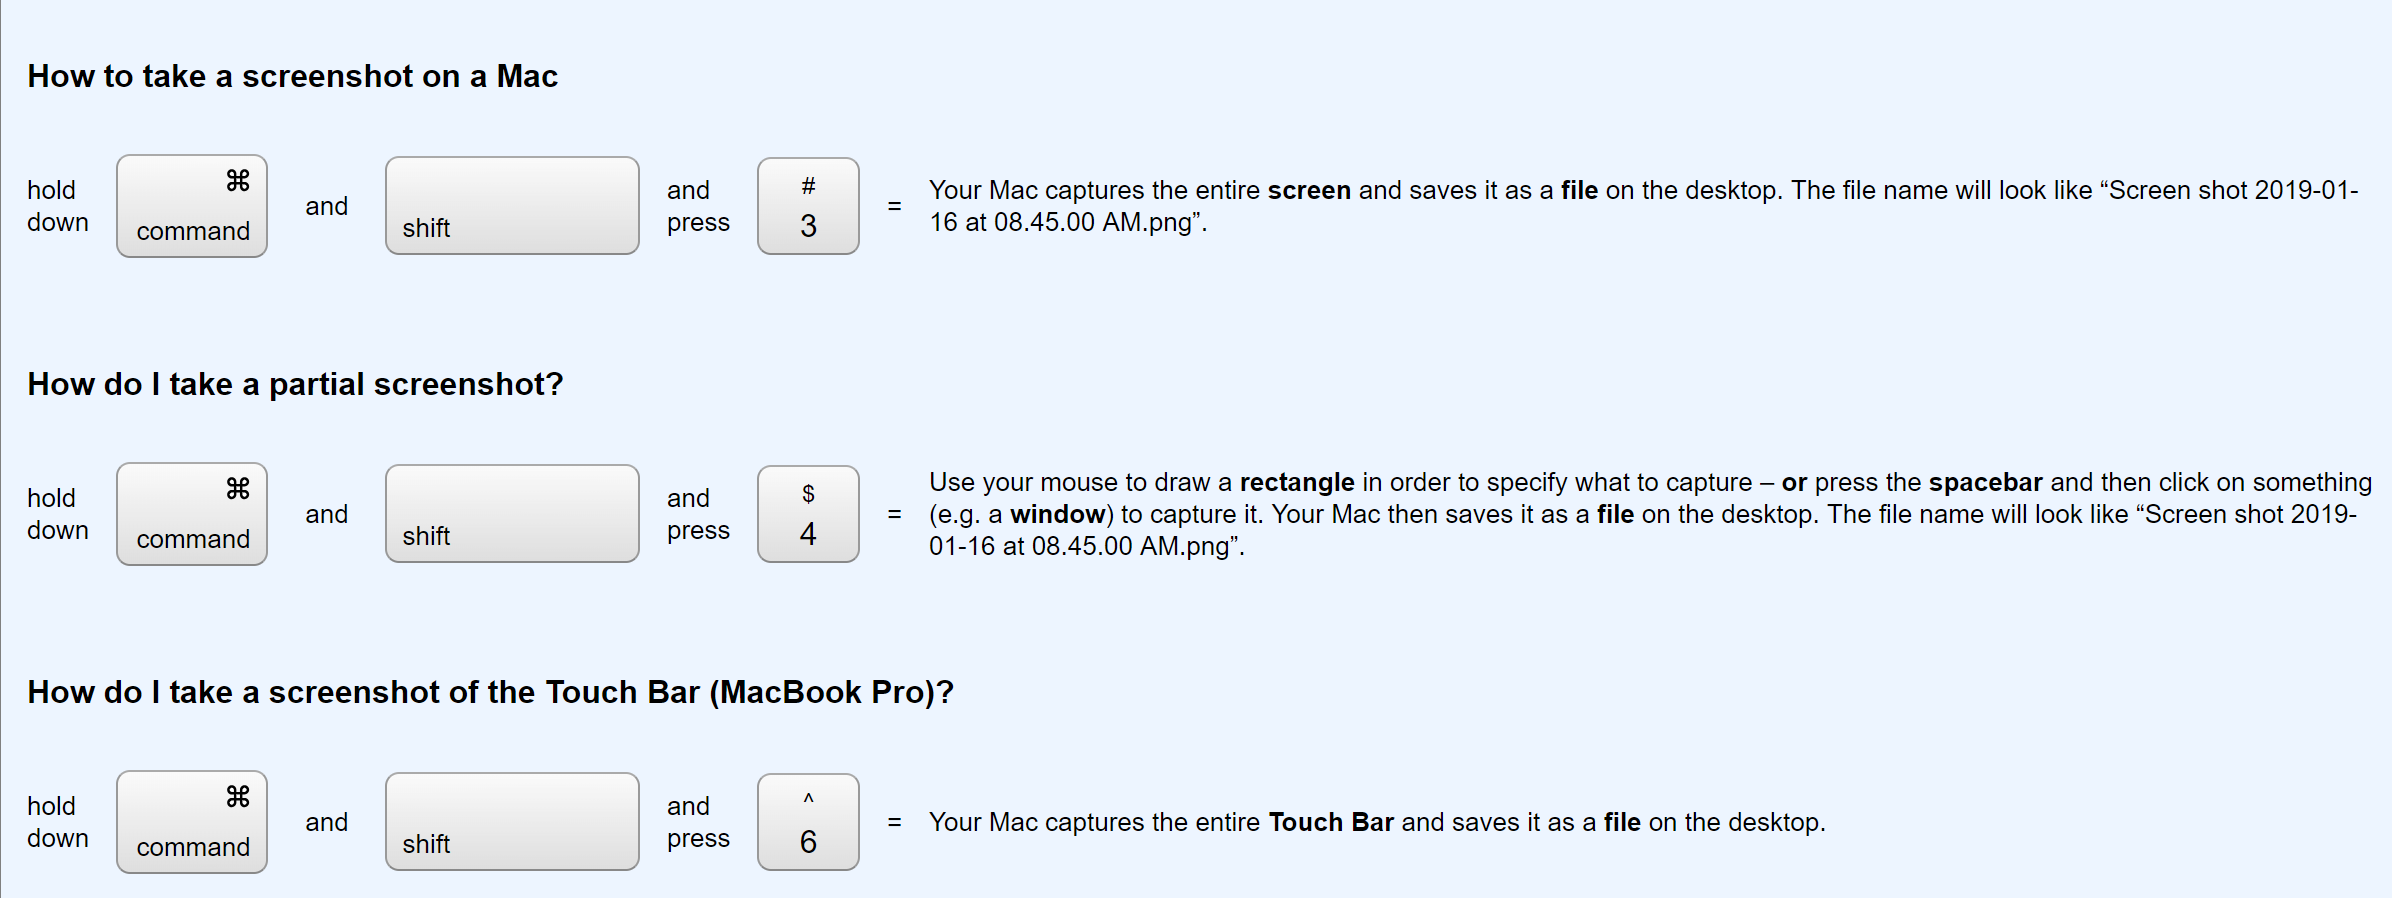
The process for capturing the entire screen on your Mac or MacBook is not too complicated. Simply press the ‘Command’, ‘Shift’ and ‘3’ keys at the same time. Below, we detail the steps to follow.
- Press and hold the ‘Command’, ‘Shift’ and ‘3’ keys at the same time.
- Now, you should hear a sound similar to that made by the shutter of a camera when you take a picture. This indicates that the screenshot was successful.
- Go to your desktop and locate the new image. This document in .png format will have the name ‘Screen capture’, followed by the date and time when the capture was made. For example: ‘Screenshot 2018-04-16 at 13.04.43’.
It is possible to change the screen format, but only after doing it. In this sense, you must open the capture with a program like Photoshop, Preview or any other and save the image with the desired extension.
On the other hand, you should know that if you have an external monitor connected to your Mac, two screenshots will be made, each of them corresponding to each of the screens.
How to take a Screenshot on a Mac using Windows keyboard?
You may be using your Mac computer with a keyboard designed for Windows devices. In this case, the process to make a screenshot differs a bit. These are the steps you must follow.
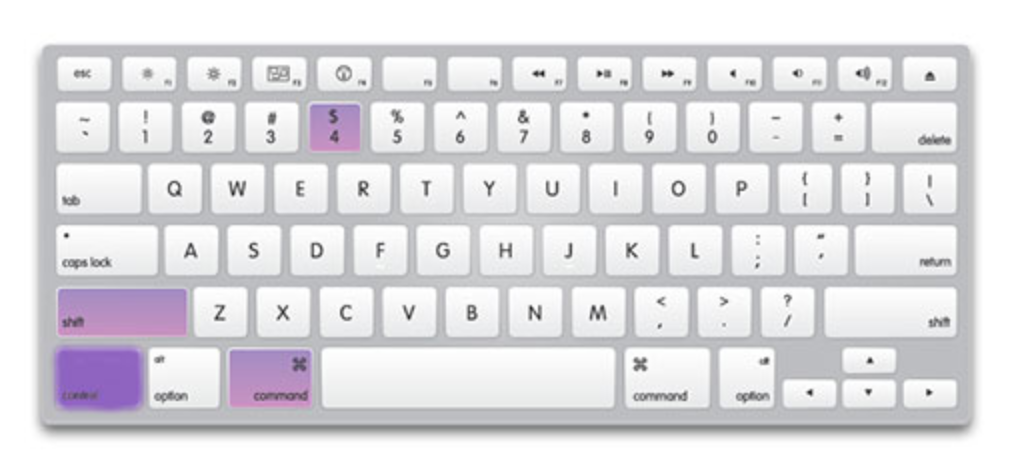
- Press and hold the ‘Windows’, ‘Option’, and ‘3’ keys at the same time.
- Now, you should hear a sound similar to that made by the shutter of a camera when you take a picture. This indicates that the screenshot was successful.
- Go to your desktop and locate the new image. This document in .png format will have the name ‘Screen capture’, followed by the date and time when the capture was made.
Source: bowerwebsolutions.com
How to take a Screenshot on a Mac using selection?
It is also possible to make a screenshot of a selection, that is, only part of the monitor. The procedure also has no greater secrecy, but here are the steps to follow.
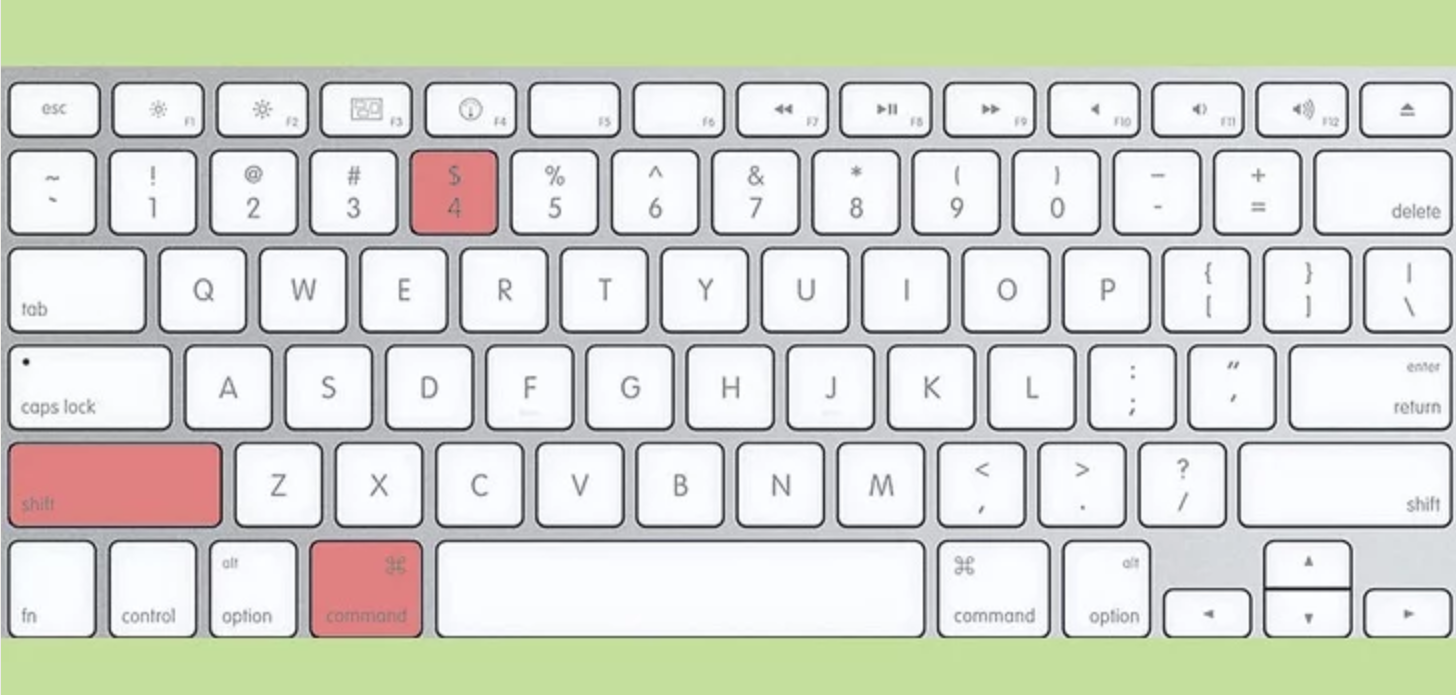
- Press and hold the ‘Command’, ‘Shift’ and ‘4’ keys at the same time.
- When you see that a cross appears as a cursor, click on one end of the part you want to capture and select the entire area. For this you can use either the left mouse button or the trackpad of your laptop and drag it diagonally.
When the little cross appears, you can stop pressing the keys. Also, when you have created the selection, you can move it to another part of the screen by pressing the space bar.
On the other hand, before leaving the cursor, press the ‘Esc’ key to eliminate the selection and thus avoid capture.
- Now, you should hear a sound similar to a camera’s shutter when you take a picture. This indicates that the screenshot was successful.
- Finally, locate the screenshot saved on your computer’s desktop. The image in .png format will be titled ‘Screen capture’, followed by the date and time it was made.
Source: wikihow.com
Also Read: DOCSIS 3.1
How to measure the selection
After typing ‘Command’, ‘Shift’ and ‘4’ and before clicking, a cross should appear. Next to it, you will see numbers in the lower right corner corresponding to the horizontal and vertical pixel number, that is, to the coordinates of the cursor when you move it around the screen.
These numbers will become the pixels of the selection when you click with the mouse or the trackpad. Thus, it will be easy for you to create the selection for you if you want to make a capture with a specific size, such as 800 x 450 pixels.
How to make a screenshot of a selection on Mac with Windows keyboard?
It is also possible to make a screenshot of a selection on Mac with a keyboard for Windows computers. Despite being very similar to the process described above, here are the steps to follow.
- Press and hold the ‘Windows’, ‘Option’ and ‘4’ keys at the same time.
- When you see that a cross appears as a cursor, click on one end of the part you want to capture and select the entire area. For this you can use either the left mouse button or the trackpad of your laptop and drag it diagonally.
- Now, you should hear a sound similar to a camera’s shutter when you take a picture. This indicates that the screenshot was successful.
- Go to your desktop and locate the new image. This document in .png format will have the name ‘Screenshot’, followed by the date and time it was made.
How to take a Screenshot on a Mac of a Window?
The trick of capturing a selection can be useful if you want to create a single-screen screen, but there is a much more efficient way to do it. To do this, you must follow the steps indicated below.
- Press and hold the ‘Command’, ‘Shift’ and ‘4’ keys with a Mac keyboard, or ‘Windows’, ‘Option’ and ‘4’ with a Windows keyboard.
- When you see that a little cross appears as a cursor, press the space bar and you will see that this cursor has now a camera shape.
- You will also notice that when you position the cursor on the window you want to capture, it will appear highlighted in blue. Now, click on it.
- Now, you should hear a sound similar to that made by the shutter of a camera when you take a picture. This indicates that the screenshot was successful.
- Go to your desk and locate the new image: a screenshot of the window with shadow included. This document in .png format will have the name ‘Screen capture’, followed by the date and time when the capture was made.
How to make a screen capture of a Mac window without shadow?
There is also the possibility of making a screenshot of a window without the shadow that appears by default in the previous trick. To do this, you must follow the steps indicated below.
- Press and hold the ‘Command’, ‘Shift’ and ‘4’ keys with Mac keyboard, or ‘Windows’, ‘Option’ and ‘4’ with a Windows keyboard.
- When you see that a little cross appears as a cursor, press the space bar. You will see that this cursor has now a camera shape.
- You will also notice that when you position the cursor on the window you want to capture, it will appear highlighted in blue. Now, hold the ‘Alt’ key and click on it.
- Now, you should hear a sound similar to that made by the shutter of a camera when you take a picture. This indicates that the screenshot was successful.
- Go to your desktop and locate the new image: a screenshot of the window without shadow. This document in .png format will have the name ‘Screenshot’, followed by the date and time it was made.
Source: http://osxdaily.com
How to make a screenshot of a pull-down menu on Mac?
The same technique described in the previous section can be used to capture any element of your screen that is not a window, such as a drop-down menu, the Dock, the upper toolbar or any icon on your desktop.
As an example, we indicate the steps to follow to make a screenshot of a drop-down menu, but they can be applied to any other element.
- Press and hold the ‘Command’, ‘Shift’ and ‘4’ keys with Mac keyboard, or ‘Windows’, ‘Option’ and ‘4’ with a Windows keyboard.
- When you see that a little cross appears as a cursor, press the spacebar and you will see that the cursor changes to a camera shape.
- Position the cursor on the drop-down menu that you want to capture -you will see that unlike the windows, it does not appear in blue- and click on it.
- Now, you should hear a sound similar to that made by the shutter of a camera when you take a picture. This indicates that the screenshot was successful.
- Go to your desktop and locate the new image: a screenshot of the drop-down menu. This document in .png format will have the name ‘Screen capture’, followed by the date and time when the capture was made.
How to take a Screenshot on a Mac with the ‘Instant’ app?
In the previous sections, we have covered most of the basic tools that the Mac offers to make screenshots using keyboard shortcuts. Now, you may also be interested in using a more advanced application called ‘Snapshot’.
This program is included in the macOS operating system. You can locate it by going to the ‘Utilities’ folder that you will find inside your ‘Applications’ folder, or with the search engine if you press the ‘Command’ key and the space bar at the same time.
This app can be used, for example, to program a screenshot or take a screenshot in JPEG or TIFF formats.
How to take a Screenshot on a Mac – Scheduling
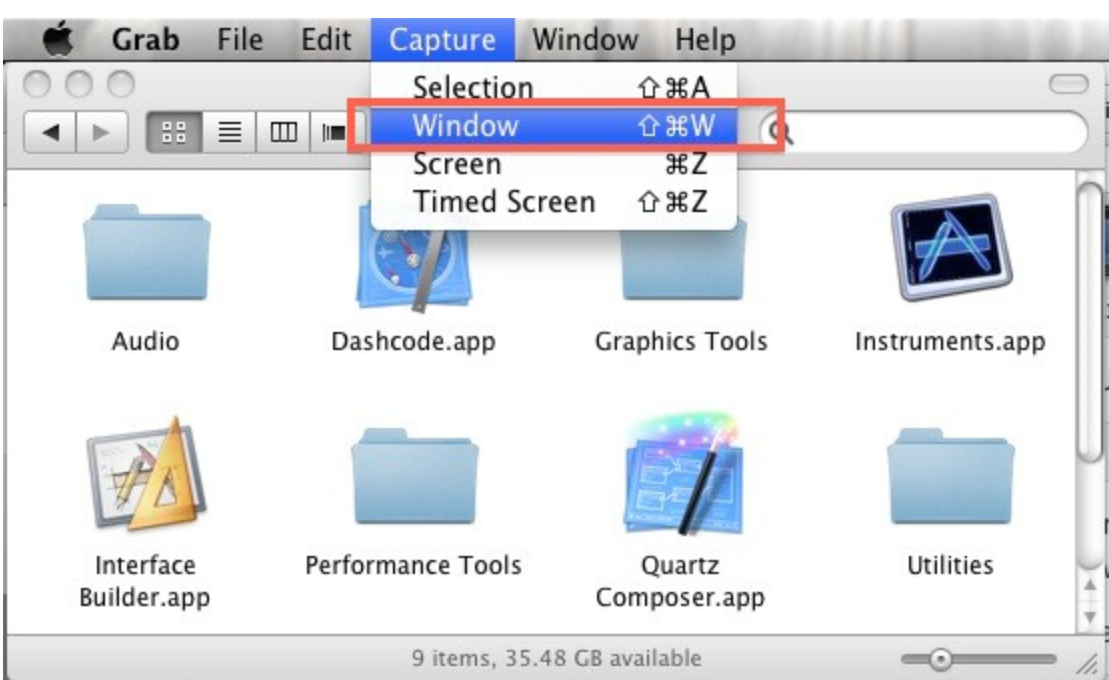
Apart from to make a capture of a selection, a window or the whole screen, the tool ‘Snapshot’ will serve you to program a screenshot. In this case, the whole screen will be captured, so you will have to edit the image afterwards if you only want one section.
- Open the ‘Instant’ application.
- Click on the ‘Capture’ tab that you will see in the top menu, followed by ‘Timer screen’.
- Next, click on ‘Activate timer’ to program the screen capture, which will be done 10 seconds after you activate the timer.
- When the timer is activated, the clock that appears next to the camera icon will be filled in red to mark the countdown. In addition, the application will tell you that only one second is needed until the capture is made with a beep.
- In addition, you should hear two beeps similar to what a camera shutter does when you take a picture when the time has run out. This indicates that the screenshot was successful.
- The capture will open automatically. You must manually save the file titled ‘Untitled’ in the folder you want, going to ‘File’, followed by ‘Save’, and finally naming the file.
How to make a JPEG or TIFF screenshot on Mac?
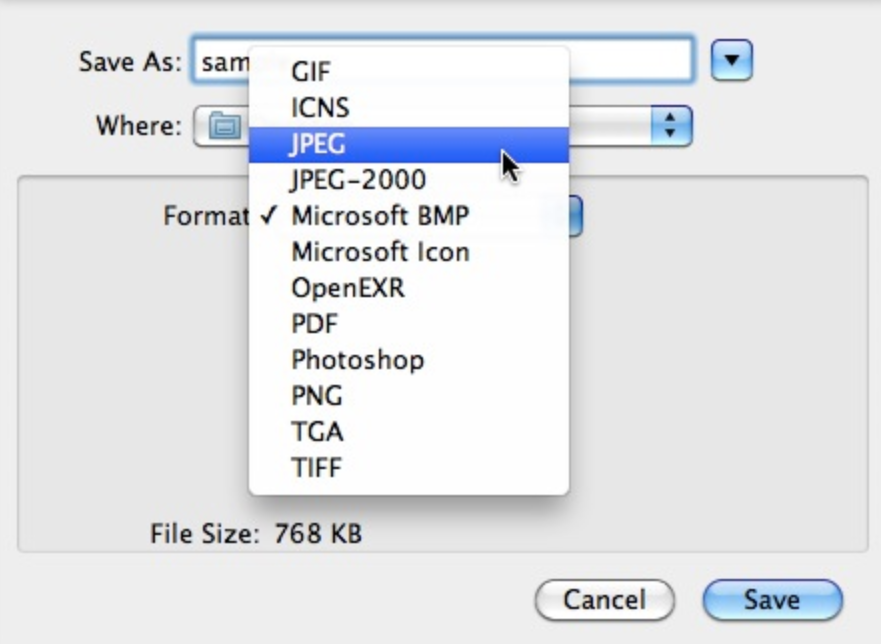
The captures made with your keyboard shortcuts are saved by default in .png, but with the help of ‘Snapshot’ you can configure your screenshots to be saved in other formats, such as .jpeg or .tiff.
- Open the ‘Instant’ application.
- Click on the ‘Capture’ tab that you will see in the top menu, followed by ‘Selection’, ‘Window’, ‘Screen’ or ‘Timer screen’.
- Follow the instructions on the screen to make the capture. It will be done correctly when you hear the sound of a shutter and the screen will open automatically.
- Save the file by going to ‘File’, followed by ‘Save’. Now you can choose the name of the file, as well as the format in which you want to save it: .png, .jpeg or .tiff.
Source: alvinalexander.com
How to print a screenshot on Mac?
- Locate the screenshot that, by default, will have been saved on your desktop, and open it by double clicking.
- When you have the image in question open in the ‘Preview’ program, select the ‘File’ tab in the toolbar, followed by ‘Print’. You can also use the shortcut by pressing the ‘Command’ and ‘P’ keys at the same time.
- Alternatively, use programs such as Adobe Photoshop or Adobe InDesign for more professional and customized results. With them, for example, you can create a collage, add visual effects or include text.
How to change where a screenshot is saved on Mac?
By default, screenshots made with keyboard shortcuts are saved on your desktop. If you use applications like ‘Snapshot’, this may vary, although you will usually find them in your ‘Documents’ folder.
To change the site where the captures are saved automatically, you must follow the steps that we show you below.
- Locate the folder where you want to save the screenshots and sign in. In our case, we are going to create a new folder on the desktop and we will call it ‘Captures’.
- Open the ‘Terminal’ application that you will find in the ‘Utilities’ folder of your ‘Applications’.
- Write the following sequence: “defaults write com.apple.screencapture location ~ / Desktop / Captures”, and hit the ‘Enter’ key. You should change everything behind ‘location’ depending on where the folder is located.
- Now write the following sequence: “killall SystemUIServer”, and hit the ‘Enter’ key.
- Check that the changes have been saved making a couple of captures with some of the tricks that we have shown you at the beginning of the article and check that they appear in the assigned folder.
How to save a screenshot on Mac to the clipboard?
Previously, when you made a screen print on your Windows computer, it was not saved as an image, but saved in the clipboard. In Windows 10 it is no longer like that, but it is easy to do it with a macOS computer.
- Press and hold the ‘Command’, ‘Shift’ and ‘4’ keys with a Mac keyboard, or ‘Windows’, ‘Option’ and ‘4’ with a Windows keyboard.
- When you see that a little cross appears as a cursor, keep the ‘Ctrl’ key pressed, click on one end of the part you want to capture and select the whole area. Use the left button of your mouse or the trackpad of your laptop and drag it diagonally.
- Now, you should hear a sound similar to a camera’s shutter when you take a picture. This indicates that the screenshot was successful.
- Go to the document where you want to copy the capture – be it Adobe Photoshop, Microsoft Office Word or any other – and press the ‘Command’ and ‘V’ keys at the same time to paste the screenshot.
Problems when making a screenshot on Mac?
Making a capture on a Mac is very simple, but sometimes small problems can arise. In this section we give you possible solutions when your computer fails to do well a screenshot.
What to do when the screenshot is empty
Unfortunately, it is not unusual for a document to be captured on your desktop to be empty or not to display certain elements of the captured screen. This can happen, mainly, because the software used has this option blocked.
This is the case, for example, of the program to play Apple DVDs, which does not allow screenings of the films to be made due to copyright issues. If this happens to you, simply use another video player.
When it happens to you with any other application, it is advisable to use an external program to take screenshots. In this sense, you can try using Snapz Pro X, Screen Recorder or Screenography.
What to do when your Mac does not take screenshots
There are several reasons why screenshots you make on your Mac or MacBook do not appear on the desktop or assigned folder. Here are some methods to solve this problem.
Solution 1. Check that you are not pressing the ‘Ctrl’ key by mistake. That would just copy the capture to your clipboard and not create a .png document on your desktop.
Solution 2. Go to the ‘System Preferences’ menu, followed by ‘Keyboard’, and there select the ‘Quick functions’ tab. Check that the shortcuts are selected below the ‘Screenshots’ section.
Solution 3. In the ‘System Preferences’ menu, check that other functions are not associated with the shortcuts that usually correspond to those of the screenshots.

